In today’s competitive e-commerce landscape, providing a seamless and efficient checkout experience is crucial for converting visitors into customers and reducing cart abandonment rates. Magento 2, one of the leading e-commerce platforms, offers extensive customization options, and integrating a specialized solution like Aheadworks One Page Checkout can significantly enhance this process.
Here, we’ll explore how to create a customized checkout experience in Magento 2 using Aheadworks One Page Checkout, detailing the benefits, features, and implementation process.
1. Why Focus on the Checkout Experience?
The great checkout process is essential for:
Reducing Cart Abandonment:
A complex or lengthy checkout process can lead to cart abandonment. Simplifying it helps to retain customers.
Increasing Conversion Rates:
A user-friendly checkout experience can improve conversion rates by making purchasing quicker and more intuitive.
Enhancing Customer Satisfaction:
A smooth and efficient checkout process improves customer satisfaction and encourages repeat purchases.
2. Introducing Aheadworks One Page Checkout
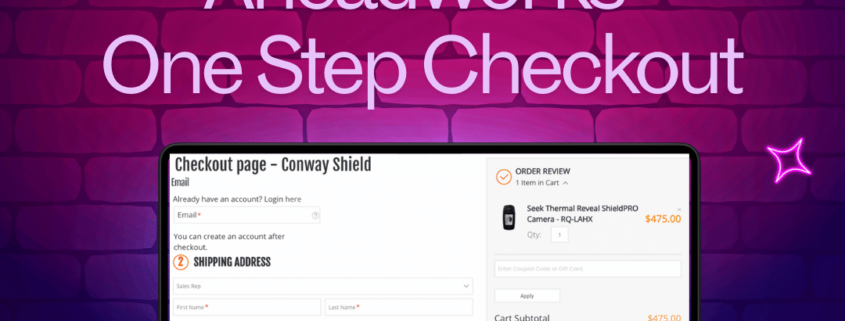
Aheadworks One Page Checkout is a powerful extension that enhances the default Magento 2 checkout experience. It consolidates all checkout steps into a single page, reducing friction and improving usability.
Key Features:
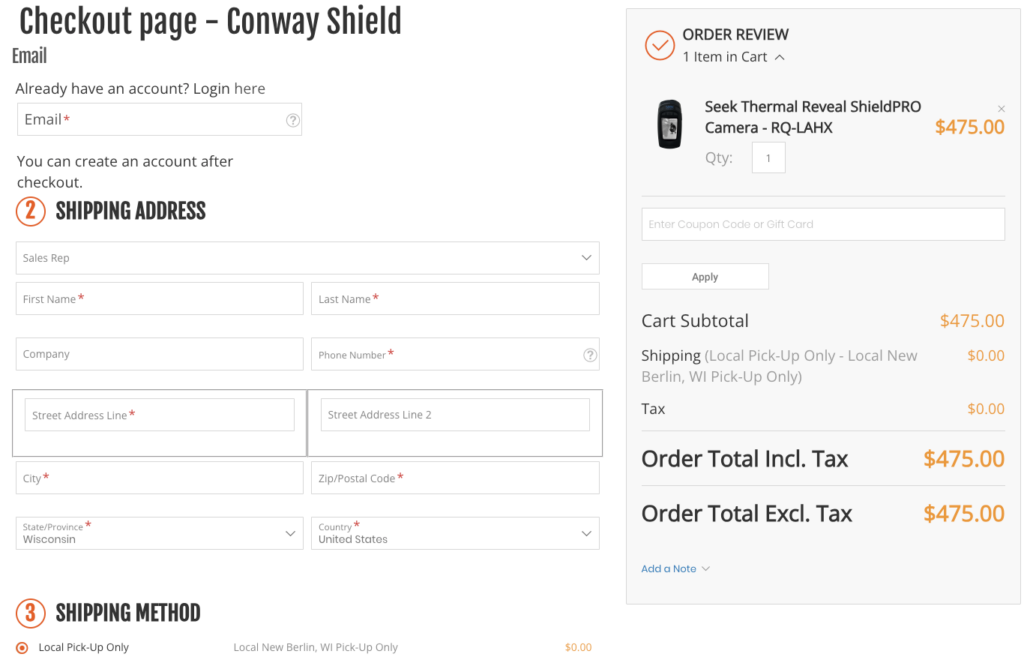
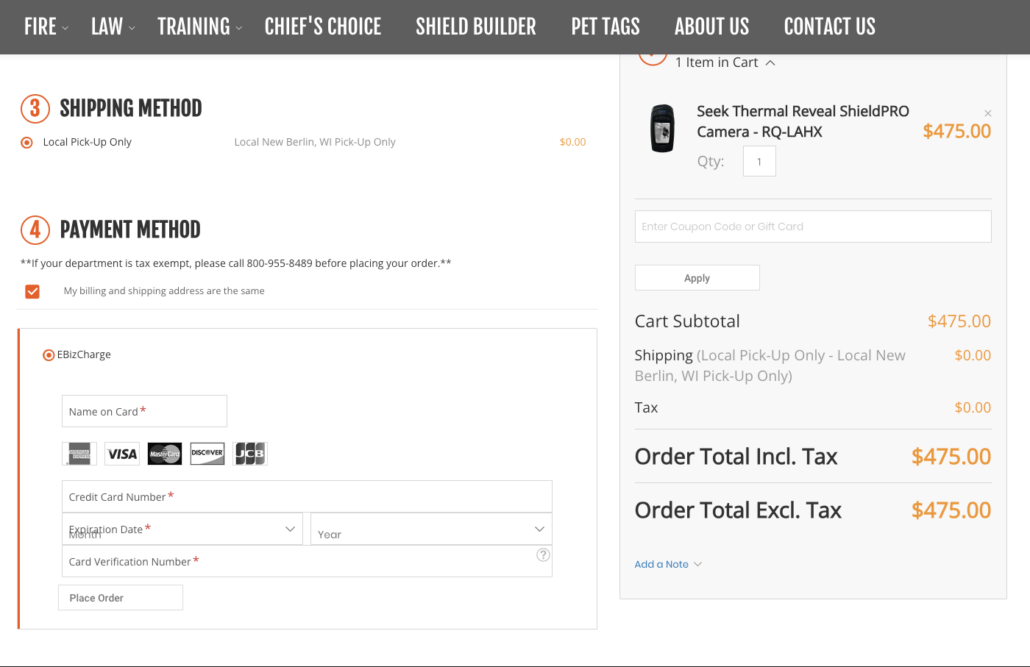
- Single-Page Layout: All checkout steps are displayed on a single page, minimizing customers’ need to navigate multiple pages.
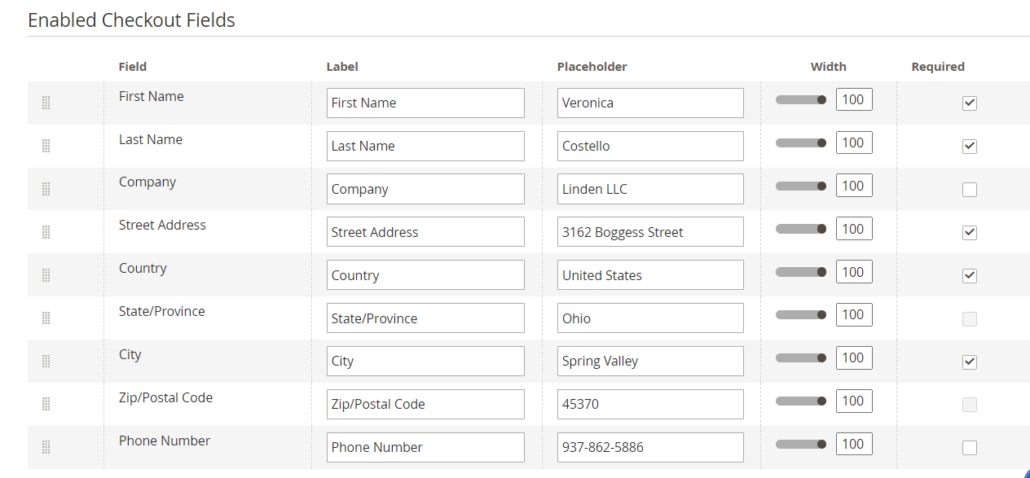
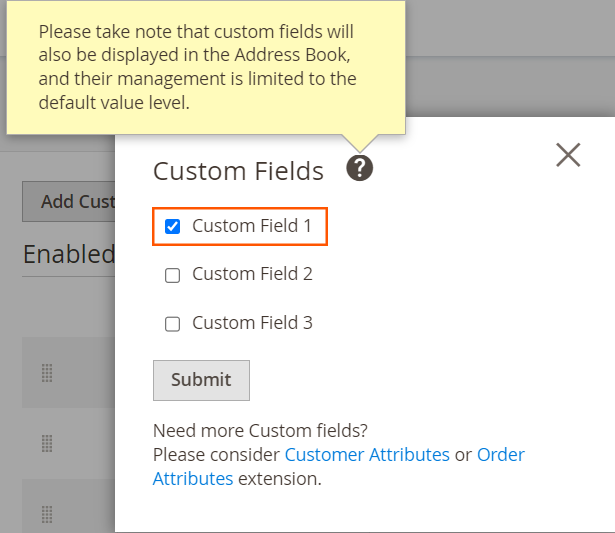
- Customizable Fields: Admins can customize checkout fields to capture only the necessary information, improving the user experience.
- Responsive Design: The extension is optimized for mobile devices, ensuring a smooth checkout experience across all screen sizes.
- Real-Time Validation: Immediate validation of entered data helps to reduce errors and ensure accuracy.
- Flexible Payment and Shipping Options: Easily integrate with various payment gateways and shipping methods, providing customers with multiple choices.
3. Benefits of Using Aheadworks One Page Checkout
Enhanced User Experience
By consolidating the checkout process into a single page, customers can complete their purchases more quickly and with less effort. The clean and intuitive interface reduces confusion and improves overall satisfaction.
Reduced Cart Abandonment
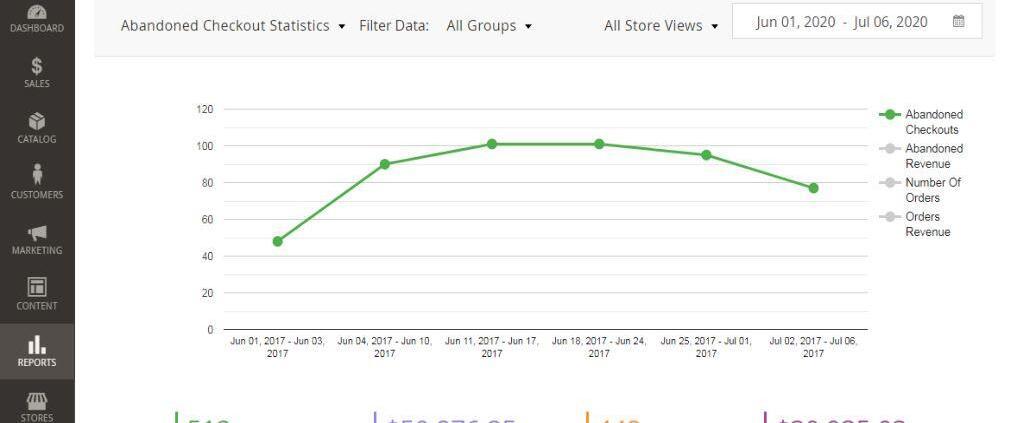
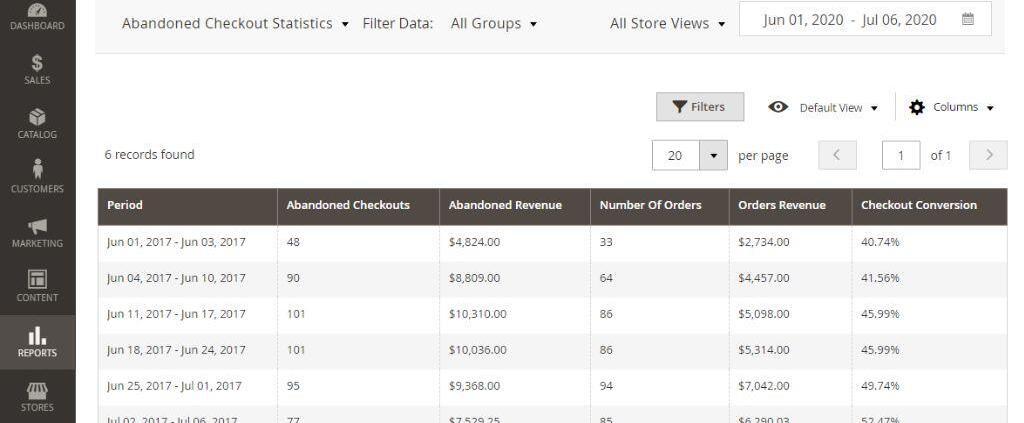
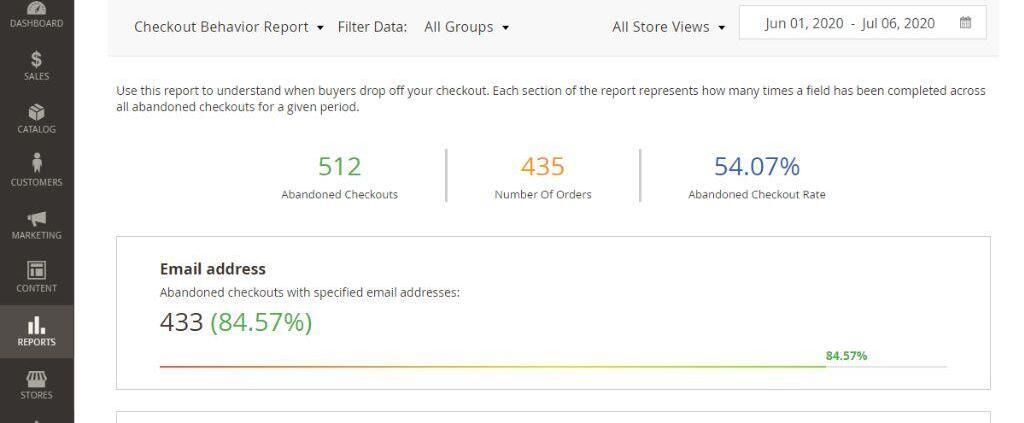
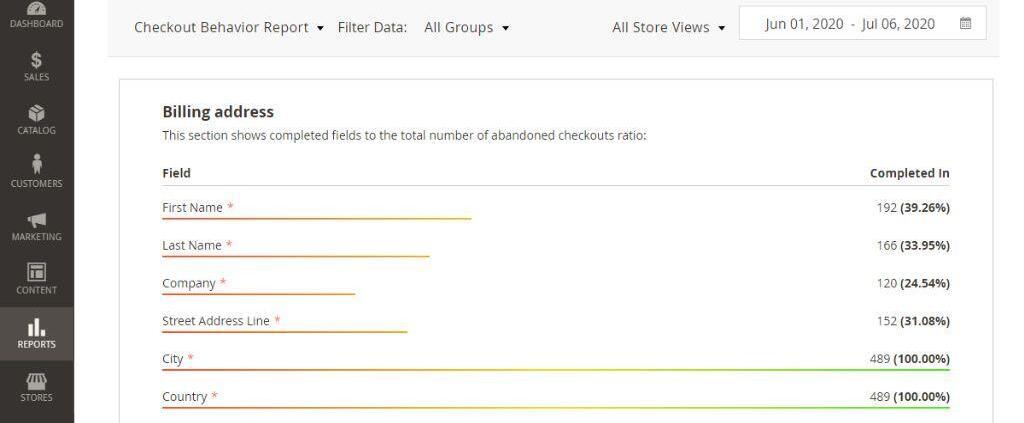
The simplified checkout process minimizes the chances of cart abandonment. Fewer steps and a more straightforward layout encourage customers to complete their purchases. Two reports provide detailed information and statistics for your analysis, including step by step analytics of the purchasing journey
Increased Conversion Rates
Streamlining the checkout process can increase conversion rates. A one-page checkout is efficient, helps keep customers engaged, and reduces the likelihood of abandoning their carts.
Customizable and Scalable
Aheadworks One Page Checkout offers extensive customization options, allowing businesses to tailor the checkout experience to their needs. It also scales with your company, accommodating growth and changes in requirements.
Step 1: Installation
- Purchase and Download: Obtain the Aheadworks One Page Checkout extension from the Aheadworks website.
- Upload Files or run the composer command per your chosen version: Upload the extension files to your Magento 2 instance using an FTP client or Magento’s file management tools. You can also use composer commands.
- Install Extension: Run the Magento 2 command line interface (CLI) to install the extension:
bash
bin/magento module:enable Aheadworks_OnePageCheckout
bin/magento setup:upgrade
bin/magento setup:di:compile
bin/magento setup:static-content:deploy
- If you are installing an extension from Aheadworks for the first time, you need to add our composer repository to your Magento store:
Login to your ssh console and navigate to your store folder:
cd path_to_the_store_root_folder |
Run the following command:
composer config repositories.aheadworks composer https://dist.aheadworks.com/ |
Upon successful execution of the command, you can use the composer to install the extensions.
To install the extension:
2. Login to your SSH console and navigate to your store folder:
cd path_to_the_store_root_folder |
3. Run the following command to install the latest version of the extension:
composer require aheadworks/module-onestepcheckout |
if you need to install a specific version, run this command:
composer require aheadworks/module-onestepcheckout: |
composer update aheadworks/module-onestepcheckout |
Updater per version:
composer require aheadworks/module-onestepcheckout: |
Run the following commands to upgrade, deploy, and clean the cache.
php bin/magento setup:upgrade --keep-generated
php bin/magento setup:static-content:deploy
php bin/magento cache:clean |
Step 2: Configuration
- Access Admin Panel: Log in to the Magento 2 admin panel.
- Navigate to Configuration: Go to `Stores` > `Configuration` > `Sales` > `Checkout` > `One Page Checkout`.
- Configure Settings: You can adjust the settings to match your business needs, such as enabling/disabling fields, customizing the layout, and setting up payment and shipping methods.
Step 3: Customization
- Customize Fields: Use the extension’s configuration options to add, remove, or modify checkout fields according to your requirements.
- Design and Layout: Adjust the design and layout settings to match your store’s branding and provide a cohesive user experience.
- Testing: Thoroughly test the checkout process to ensure that all functionalities work as expected and that there are no issues with data entry or validation.
Step 4: Go Live
- Final Review: Conduct a final review of the checkout process to ensure everything is working correctly.
- Launch: Make the new checkout experience live on your Magento 2 store.
- Monitor Performance: Track the performance of the new checkout process, including conversion rates and customer feedback, to ensure it meets your business objectives.
Step 5: Google Analytics and reports
Configure Google Analytics features of Enhanced Ecommerce to gather more insights about your checkout performance.
How do you view the Enhanced Google Analytics Ecommerce Report for the Magento One Page Checkout?
To get started with Enhanced Ecommerce reports, follow these steps:
- Sign in to your Analytics account.
- Select the desired view.
- Click Reports.
- Select Conversions → Ecommerce.
Moreover, the Checkout Behavior Analysis Report allows you to track user behavior throughout the checkout process. The informative visualization of the checkout flow allows you to see how many users move from one step to another or leave the site at one stage or another.
4. Best Practices for a Successful Checkout Experience
Keep It Simple
Focus on minimizing the number of fields and steps in the checkout process. Ask for only essential information to avoid overwhelming customers.
Provide Clear Instructions
Ensure that instructions and error messages are clear and easy to understand. Real-time validation helps customers correct mistakes promptly.
Optimize for Mobile
Ensure that the checkout process is fully optimized for mobile devices, providing a seamless experience for customers on smartphones and tablets.
Offer Multiple Payment and Shipping Options
Provide a range of payment methods and shipping options to cater to different customer preferences and increase convenience. Conway Shields uses USPS, UPC, and local pickup.
Test Regularly
Test the checkout process regularly to identify and resolve any issues. Gather feedback from customers to continuously improve the experience. This extension has also two reports
Security
Add Google Recaptcha and security seal. It is also very common to add fraud detection tools. One of them, Signifyd, is built in Magento 2.
Conclusion
Implementing Aheadworks One Page Checkout in Magento 2 can significantly enhance the checkout experience for your customers. By simplifying the process, reducing cart abandonment, and increasing conversion rates, this extension provides a valuable solution for improving your e-commerce store’s performance. Follow the steps outlined in this article to effectively integrate and customize the extension and leverage best practices to ensure a successful and user-friendly checkout experience.







Share this entry